Wednesday, 17 June 2015

MAJOR UPDATE NEEDED


 Following my First semester of my third and final year of          University at Staffs I had been experimenting with my hand drawn   patterns it lead me into my second semester.

 Wanting to further my designs, whether that be in texture, or print.  I looked into both, after years of dried clay hands print was  becoming more appealing to explore.


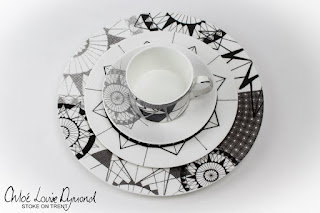
With learning lots of tips and tricks over the years on Adobe Photoshop and Illustrator, I scanned my drawings in and slightly edited them on Illustrator as I originally drew them in semi circles so matching them up to make complete circles. 

Putting them onto plate and mug templates as seen above, layering and exploring different tonal levels. Whether to cover the rims, or cover the whole plates.

 I used table setting images from the internet and put my designs in instead to see what types of setting I was aiming for.


Here are a few images of my finished products
With many thanks to my good friend for doing me a great favour 
Ross Andrew Powell (Links to his pages at the bottom) 


 ( Last four images credit to Ross Andrew Powell Link
                                                                    YouGotPowelled )


Tuesday, 24 February 2015

Concluding first semester of my final year


 Since my last post I completed the first semester of my final university year :( 
I produced geometric ceramic trays, which have the relief of the first laser 
etched lino I experimented with.


Behind the scenes photo.

Drawing more and more led me to doing more linear intricate patterns, which are very angular with the majority based on the same starting pattern the expanded and manipulated to create new patterns. Etched new patterns onto lino through the laser cutter, utilizing the flexibility of the lino allowed me to create quick and easy plaster models to visualize my pattern as a 3 Dimensional object. 


Friday, 14 November 2014

Inspiring Inspiration & Self Motivation


Well I haven't posted for a while, with a busy summer of holiday makers flooding the supermarket, spending time in the sun and being hospital bound! So my third year university work was halted. Now back on track here is what I've been up to;


Over the summer every spare 10 mins I had I was doodling MANDALA inspired sketches, which slowly turned into rather geometrical like the bottom right in the picture. The more I've experimented with this style of pattern the more exuberant they are getting, more detailed areas to larger areas of space and blackness. 

I've decided to move forward with these patterns, not only in the form of 2D patterns, but 3D technologies. So I scanned selected patterns into Adobe Illustrator to set up a laser cutter file. Bought myself some Vinyl and off I went.


This is the first time I have personally used the laser cutter offered to us at University. My fellow course member has used it and the result were simply beautiful. So I thought why not give it a go, what's the worst that could happen?


I'm hoping to further these patterns by incorporating them into my designs, applying them to the 3D objects. My vision of them being an elevated tray with etched patterns on the surface with additional containers mimicking the designs in various ways. Making them flow off the etched 2D ceramic tray through vessels.


Monday, 30 June 2014

A way with Wedgwood


So us students had our way with one of The Wedgwood Museum glass show cases. 
Where we are displaying our 'DOT' (designers of the future) exhibition. Our work steams from within the Museum's 20th century collection. 

This collaboration has been a great experience for me and everyone in our group :)


Here is our display ( not all of it, as it needed more adding) 


My inspiration, Robert Minkin's 1960s black basalt pieces.


And finally my samples that I presented to the board at The Wedgwood Museum.

Wednesday, 16 April 2014

Getting closer to perfection

Here are two of my initial shapes I have been producing for the Wedgwood Project, I am have started to make other shape to accompany these. I am enjoying learning the ways of Black Jasper and its behaviour. Its exciting to be casting in a new slip body and exploring its potential.


I added the feature of a ringed bottom on my first shape, to add texture and an element of surprise when picked up. Here I decided to decorate the shoulder of one piece, to see what transparent glaze could achieve on a matt Black Jasper body. Sketchily done done I think the intention shows. Intention of contrasting between matt and gloss.


Glaze tests

Glaze tests.


With these black jasper scraps from the reservoirs of my plaster moulds I decided to test some transparent glazes. Looking at the contrast between shiny transparent glaze and a matt black surface, and what it could achieve with a paint brush and a bit of masking tape. Here are some fired pieces. I am pleased with how they have turned out. Adoring the contrast and will maybe take it further to apply onto my main slipped cast pieces.


Moulds Moulds Moulds

And more moulds. One of my Wedgwood inspired shapes being slip cast up, using black jasper as I believe it truly represents Wedgwood. The smaller mould shown below, was an experiment. I started by pouring black jasper into the mould leaving for around 5 minutes so the cast thickness wasn't very much. Then emptying the Black Jasper out and refilling with an earthenware slip. For a true monochrome look. The only worry was that the two wouldn't fuse because of the slip meet and crack apart, luckily enough they didn't!!